
Blog, Learn Face Painting
Easy Fairy Face Paint: A Step-by-Step 2026 Guide for Beginners
Creating a breathtaking fairy design doesn’t require the hands of a master illustrator. It actually requires a strategic map of the face. You want to give every child that magical moment in the mirror, but the pressure of a growing line and the fear of a shaky brush can make your heart race. It’s common to worry about taking too long per child or watching your hard work smudge because of poor technique. At Face Painting Course Online, we understand that your goal is to deliver professional results without the stress of “messing up” a young guest’s face.
This 2026 guide is your shortcut to artistic confidence. We’ll show you how to master an easy fairy face paint look using our signature three-step template that prioritizes speed and impact. You’ll learn how to choose skin-safe, professional materials that meet the latest MoCRA safety standards, ensuring every design is as safe as it is beautiful. By the end of this article, you’ll have a go-to speed design that guarantees smiles and perfect brush control for every party on your calendar.
Key Takeaways
- Master a three-point focal template that allows you to create high-impact designs using just two colors and minimal brush strokes.
- Discover the secret to a professional-looking easy fairy face paint mask by focusing on symmetry and soft sponge gradients.
- Learn why Lets Paint Face Painting School prioritizes FDA-compliant, water-based paints to ensure skin safety and easy cleanup.
- Explore simple techniques to adapt your base design into themed variations like woodland sprites or winter queens using one-stroke petals.
- Understand how mastering speed and hygiene serves as the foundation for transitioning from a casual hobbyist to a booked-out artist.
The Secret to Quick and Easy Fairy Face Paint Designs
You’ve likely seen those intricate, full-face masks on social media that look like fine art. They’re stunning, but they aren’t always realistic when you have a line of twenty excited children waiting for their turn. While the history of face painting reveals a rich tradition of complex body art, modern parties require a different approach. We define easy fairy face paint as a design that relies on just three focal points and two primary colors. This structured framework allows you to create a professional look in record time without feeling overwhelmed by the process.
Symmetry is your greatest ally when you’re starting out. When you mirror your strokes on both sides of the face, the design feels intentional and magical, even if your lines aren’t perfect yet. At Lets Paint Face Painting School, we advocate for the ‘3-minute rule’ during high-volume events. By limiting your time per child, you keep the energy high and the parents happy. To achieve this, you must master the concept of ‘Visual Weight.’ By concentrating your artistic effort on the forehead and the outer corners of the eyes, you create a high-impact mask that looks complete without needing to paint the entire face. This strategy allows you to transition from a nervous beginner to a confident artist who can handle any crowd size.
Why Beginners Struggle with Fairy Designs
Most newcomers fail because they overcomplicate the design with fine details too early. Using the wrong tools is another common hurdle; always stick to #4 and #6 round brushes for precision on small faces. Finally, beginners often struggle to account for child movement. Choosing a streamlined design allows you to stay calm and deliver a beautiful result, even when your young client can’t sit still for long.
The ‘Three-Point Focal’ Concept
The secret to a balanced mask lies in three specific areas. Point one is the center of the forehead, or the ‘crown jewel.’ Points two and three are the outer corners of the eyes, forming the ‘wings.’ Focal points are the anchors of any successful fairy mask. By focusing on these specific spots, your easy fairy face paint will look balanced, professional, and symmetrical with minimal effort.
Essential Supplies: Professional Paints and Skin Safety
Your journey into easy fairy face paint begins with the contents of your kit. While it is tempting to grab inexpensive sets from a craft store, professional results require professional tools. At Lets Paint Face Painting School, we advocate for water-based paints because they allow the skin to breathe and are far more comfortable for children to wear. These paints are also much easier to remove with just soap and water, which parents always appreciate. It is vital to check for FDA face paint safety compliance on every label you buy. As of 2026, regulations like MoCRA ensure that cosmetic-grade products are tested for safety. Never use craft paint; it isn’t formulated for the skin and can cause severe allergic reactions.
A professional beginner kit should be lean but effective. You only need a few high-quality items to start. We recommend a 1-inch flat brush for larger wing shapes, a #4 round brush for delicate details, and a petal sponge for soft blending. Don’t forget the ‘Glitter Rule.’ Only use cosmetic-grade polyester glitter. Craft glitter is often made of metal or glass and can cause permanent eye damage if it migrates. By sticking to these professional standards, you protect your young clients and your reputation as an artist.
Selecting Your Fairy Palette
Choosing your colors is where the artistic wonder truly begins. We suggest the ‘Magic Trio’ approach: pick one main color like a soft lilac, a highlight like white, and a darker contrast color for depth. If you want to create stunning effects in seconds, use ‘Split Cakes.’ These multi-colored cakes are the secret to 10-second rainbow fairy wings. Stick to pastels like pinks, purples, and teals. These are the industry standard for fairies because they look ethereal on every skin tone and blend beautifully together.
Hygiene and Skin Safety Protocols
Professionalism starts with safety and cleanliness. Research shows that nearly 30% of children in the U.S. have diagnosed skin sensitivities. Always perform a professional patch test on the inner wrist if a child has reactive skin. Sanitize your kit between every client to prevent cross-contamination. This is a core part of being a professional artist. For more details on setting up your workspace safely, check out our face painting for beginners guide. If you’re ready to master these looks, our Princess & Fairy Face Painting Designs course offers deep dives into these professional techniques.
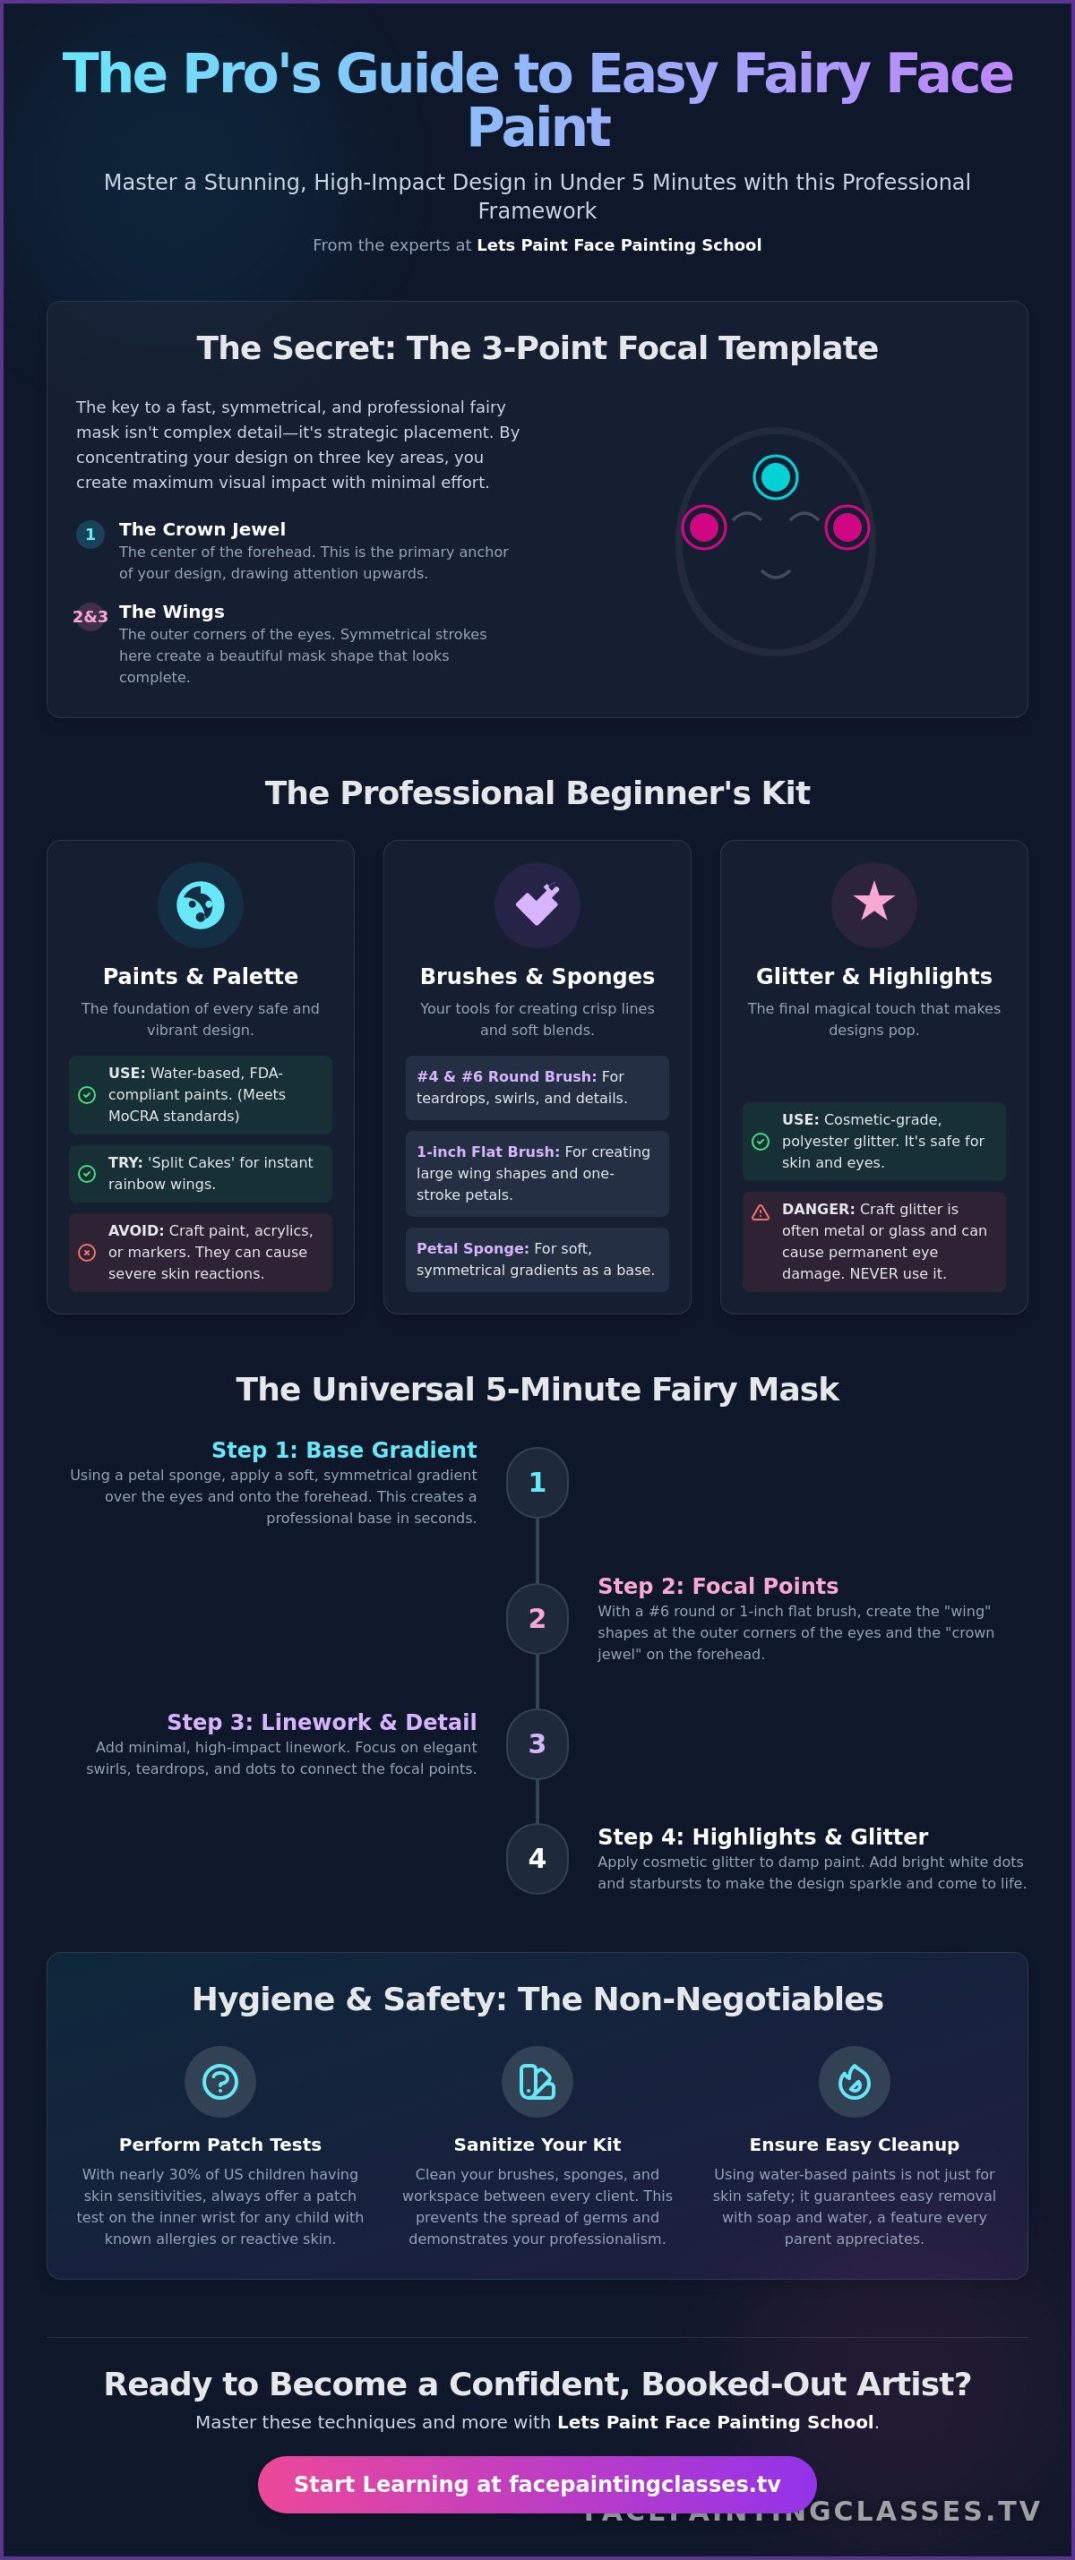
Step-by-Step Tutorial: The Universal 5-Minute Fairy Mask
Mastering a quick, reliable design is the secret to staying calm when your line of eager clients starts to grow. This universal template for easy fairy face paint is designed to work on any face shape and uses a repeatable sequence that you can commit to memory. By following these five steps, you ensure a professional result every time without needing to overthink your next move. It is about creating a flow that feels natural and rhythmic, allowing your artistic wonder to shine through each stroke.
- Step 1: Sponging the Base. Start with a damp petal sponge. Create a soft gradient of color across the eyes and up toward the temples. This provides the “canvas” for your linework.
- Step 2: The Focal Crown. Place your central anchor point at the center of the forehead. A single large teardrop or a shimmering star establishes the “crown” of the fairy mask.
- Step 3: Framing the Eyes. Use your #4 round brush to add swirls and teardrops that flow from the outer corners of the eyes toward the focal crown. This creates a sense of movement and grace.
- Step 4: Adding the Magic. While the paint is still slightly tacky, apply your cosmetic-grade glitter to the focal points. Always adhere to FDA guidelines on face paint safety by keeping glitter away from the immediate eye area to prevent irritation.
- Step 5: Final Highlights. Use crisp white paint to add small dots and starbursts. These tiny details make the entire design “pop” and give it a polished, professional finish.
Mastering the Teardrop Stroke
The teardrop is the building block of almost every fairy design. To get it right, you must master the “press, pull, lift” technique. Start with firm pressure to create a rounded head, then slowly lift the brush as you pull it toward the tail. At Lets Paint Face Painting School, we use specific practice drills to help students avoid “fat” tails. Consistent brush control ensures your easy fairy face paint looks delicate and ethereal rather than heavy.
Sponging for Smooth Gradients
A beautiful base depends entirely on your sponge loading. Your sponge should be damp, never dripping. Use the “Dab and Twist” technique to blend colors directly on the skin for a seamless transition. This prevents colors like pink and purple from becoming “muddy.” When you master this blending skill, your designs gain a professional depth that sets your work apart from amateur attempts.
Customizing Your Fairy: Flower, Snow, and Woodland Themes
The beauty of the three-point focal template is its incredible versatility. You don’t need to learn dozens of unique designs to satisfy every child’s request. Instead, you can adapt your core easy fairy face paint structure by simply changing your color palette and adding a few themed elements. This “template-first” approach is exactly what we teach at Lets Paint Face Painting School to help you build speed without sacrificing quality. It allows you to focus on the artistic wonder of the craft while maintaining a structured framework that guarantees success.
For a Woodland Fairy, swap your pastels for earthy tones. Use deep forest greens, warm browns, and golden yellows. Instead of traditional swirls, use your round brush to create organic leaf shapes trailing from the outer corners of the eyes. This minor shift transforms the entire aesthetic into something rustic and magical. You can also incorporate stick-on gems or small stencils to add high-value detail in seconds. These professional shortcuts are essential when you’re working through a busy event and need to keep the line moving.
The Flower Fairy Variation
Turning your base design into a Flower Fairy is a favorite for garden-themed parties. Use a #6 round brush to press five simple petals around your focal points. This creates instant blossoms that look far more complex than they actually are. You can add tiny clusters of white dots to represent pollen and fairy dust, giving the design a delicate, finished feel. If you’re looking for more ways to master organic shapes, our animal face painting guide provides excellent tutorials on leaf techniques that apply perfectly to nature-themed fairies.
Winter and Ice Fairy Styles
When a child asks for something inspired by a snow queen, reach for an “Ice Blue” split cake. Use your petal sponge to create a cool gradient that fades from deep blue at the outer edges to crisp white near the eyes. Instead of hand-drawing every detail, use a starburst stencil to create instant snowflake effects at the temples. This saves time and ensures perfect symmetry every time. Finish the look with iridescent polyester glitter to mimic the appearance of frost on the skin.
Mastering these variations is a transformative journey that builds your confidence as an artist. If you’re ready to expand your repertoire and gain professional-level speed, enroll in our Princess & Fairy Face Painting Designs course today. We’ll guide you through every nuance of these magical styles, helping you move from a casual interest to a high-level career in the world of professional face painting.
Mastering the Art with Lets Paint Face Painting School
Learning to execute a single design is a wonderful start, but true mastery comes from understanding the logic behind the strokes. When you grasp the “why” behind your composition, you stop merely copying a picture and start creating art. At Lets Paint Face Painting School, we believe that understanding focal points and color theory is what allows you to adapt an easy fairy face paint template to any situation. This foundational knowledge is the bridge between a nervous beginner and a confident professional who can handle any request with grace and speed.
The transition from a hobbyist to a professional artist requires a shift in mindset. Speed and hygiene become your primary metrics for success. In the professional world, artists can earn between $100 and $180 per hour, but those rates are only sustainable if you can deliver high-quality results in under three minutes. Managing your kit with strict sanitization protocols is equally vital. It builds trust with parents and ensures the safety of every child. Handling “fidgety” children is another professional skill you’ll develop; we teach you how to use a “gentle anchor” with your pinky finger to steady your hand while keeping the child engaged and still.
Fairy designs are more than just pretty masks; they are a strategic asset for your face painting business startup. Because they are universally popular and highly customizable, they often become your most requested design. Mastering this one category can significantly boost your booking rate for princess-themed parties and community festivals.
Building Your Professional Portfolio
Your portfolio is your most powerful marketing tool. When photographing your easy fairy face paint designs for social media, always use natural, indirect light to capture the true vibrancy of the colors. Lets Paint Face Painting School emphasizes a consistent style in your portfolio to build a recognizable brand identity. A cohesive look tells potential clients exactly what level of excellence they can expect when they hire you. Remember that a stunning fairy design is also your best “upsell” for premium party packages, as it adds a touch of high-end magic that parents are happy to pay for.
The Path to Professional Certification
If you feel the spark of artistic passion turning into a career goal, our structured educational framework is here to support you. The Ultimate Face Painting Course offers comprehensive modules that take you from basic brush control to advanced business strategies. You don’t have to walk this transformative journey alone. Our supportive community provides a space for feedback on your first designs, helping you refine your skills in a welcoming environment. Ready to paint like a pro? Join Lets Paint Face Painting School today!
Step Into Your Magical Career
You now possess the foundational tools to create breathtaking designs with confidence. By mastering the three-point focal template and prioritizing skin-safe, professional materials, you can turn any party into a magical experience. We’ve explored how a single easy fairy face paint structure can be adapted into countless themes, from woodland sprites to icy queens. This versatility is the hallmark of a professional artist who values both speed and artistic wonder.
If you’re ready to take your skills to the next level, our structured programs are designed to support your growth. You can Enroll in The Ultimate Face Painting Course for Professional Results to access step-by-step video tutorials by Maria Mitchell. This course includes a comprehensive module on ‘Princess & Fairy’ designs and the essential business training you need to thrive as a professional artist. At Lets Paint Face Painting School, we believe your creative potential is limitless. Grab your brushes and start your transformative journey today; the world is waiting for your sparkle.
Frequently Asked Questions
What is the easiest fairy face paint design for a total beginner?
The easiest fairy face paint for a total beginner is a simple three-point mask that focuses on the forehead and the outer corners of the eyes. By placing a central “crown” jewel and mirroring two soft wings on the temples, you create a balanced look without needing to cover the entire face. This template allows you to achieve a magical result with just a few strokes, keeping the process stress-free while you build your confidence.
How do I make my fairy face paint look professional and not messy?
To ensure your design looks professional, you must master water control and symmetry. Messy designs usually happen when your paint is too watery or your brush is overloaded. At Lets Paint Face Painting School, we teach students to aim for a “creamy” paint consistency. Using a steady anchor point, like resting your pinky on the child’s face, will help you maintain the brush control needed for clean, intentional lines.
What colors are essential for a basic fairy face painting kit?
A basic fairy kit requires white for highlights, along with a palette of pink, purple, and teal. These pastel shades are the industry standard because they blend beautifully to create an ethereal, glowy effect. You should also include a “split cake” that contains multiple colors in one strip. This professional tool is the secret to creating multi-colored wings in a single swipe, which instantly elevates the artistic quality of your work.
How long should a simple fairy face paint design take at a party?
A simple fairy design should take between three and five minutes at a busy party. Professional artists aim for this speed to keep lines moving and ensure every child gets a turn. By using a “speed design” template that focuses on high-impact focal points rather than tiny details, you can maintain a high standard of excellence without falling behind. This efficiency is a core skill we emphasize for anyone looking to go professional.
Can I use regular craft glitter for fairy face painting?
You should never use regular craft glitter for face painting because it can cause serious eye injuries. Craft glitter is often made of metallic or glass particles that have sharp edges. Always choose cosmetic-grade polyester glitter, which is cut into rounded shapes and is safe for use on the skin. Safety is a non-negotiable part of the craft, and using the right materials is the first step toward a professional career.
How do I paint fairy wings on a child’s face without it looking like a butterfly?
To distinguish fairy wings from a butterfly, keep the shapes more elongated and angled upward toward the temples. Butterfly wings usually have a more rounded, structured four-wing shape that covers the cheeks. An easy fairy face paint design should feel lighter and more organic, often trailing off into swirls or starbursts. Focus on the “flow” of the lines rather than creating a closed wing shape to maintain that whimsical, sprite-like aesthetic.
What are the best brushes for painting fine fairy details?
The best brushes for fine fairy details are high-quality synthetic #4 and #6 round brushes. These sizes offer the perfect balance of paint capacity and precision for creating delicate teardrops and swirls. A brush with a good “snap” will return to its point after every stroke, allowing you to maintain consistent line work. Investing in professional-grade brushes is a hallmark of quality that makes the learning process much smoother for beginners.
How do I remove face paint from sensitive skin without scrubbing?
Removing face paint from sensitive skin is best done using a mild, fragrance-free liquid soap or an oil-based cleanser. Apply the soap directly to the dry paint and massage gently to break down the pigment before adding water. This technique prevents the need for harsh scrubbing, which can irritate the skin. Since nearly 30% of children have skin sensitivities, using this gentle approach ensures a comfortable experience for your young clients from start to finish.
