
Blog
Easy Fairy Face Paint Tutorial for Beginners (2026)
What if you could create a magical, ethereal fairy mask in under five minutes without ever worrying about perfect symmetry? Many aspiring artists feel a wave of anxiety at the thought of smudging a delicate line or failing to make the wings match on both sides of the face. At Lets Paint Face Painting School, we believe that every student has the potential to create wonder, regardless of their current skill level. This easy fairy face paint tutorial is designed to strip away the complexity and replace it with a foolproof layering technique that delivers professional results every time.
We understand the frustration if you don’t know which brush to grab or how to keep colors from turning muddy. That’s why we’re sharing our “Fairy Mask” strategy, a high-impact approach that focuses on the eyes and forehead to save you time and stress. You’ll learn how to master basic sponge and blending techniques while discovering the secret to adding professional sparkle that truly wows. This guide serves as your first step toward our more advanced Princess & Fairy Face Painting Designs, giving you the confidence to turn a casual interest into a stunning artistic skill.
Key Takeaways
- Discover why the “Fairy Mask” technique is the secret to creating high-impact, professional designs in half the time of a full-face look.
- Learn why professional-grade water-activated makeup and high-density sponges are essential for achieving smooth, vibrant, and safe results.
- Follow our step-by-step easy fairy face paint tutorial to master the art of sponging gradients and building foolproof layers.
- Explore creative variations like the “Frozen” Fairy and Forest Pixie to adapt your designs for any theme or request.
- Understand how transitioning from casual tutorials to a structured curriculum at Lets Paint Face Painting School can turn your artistic passion into a profitable career.
Why the Fairy Design is the Ultimate “Money-Maker” for Beginners
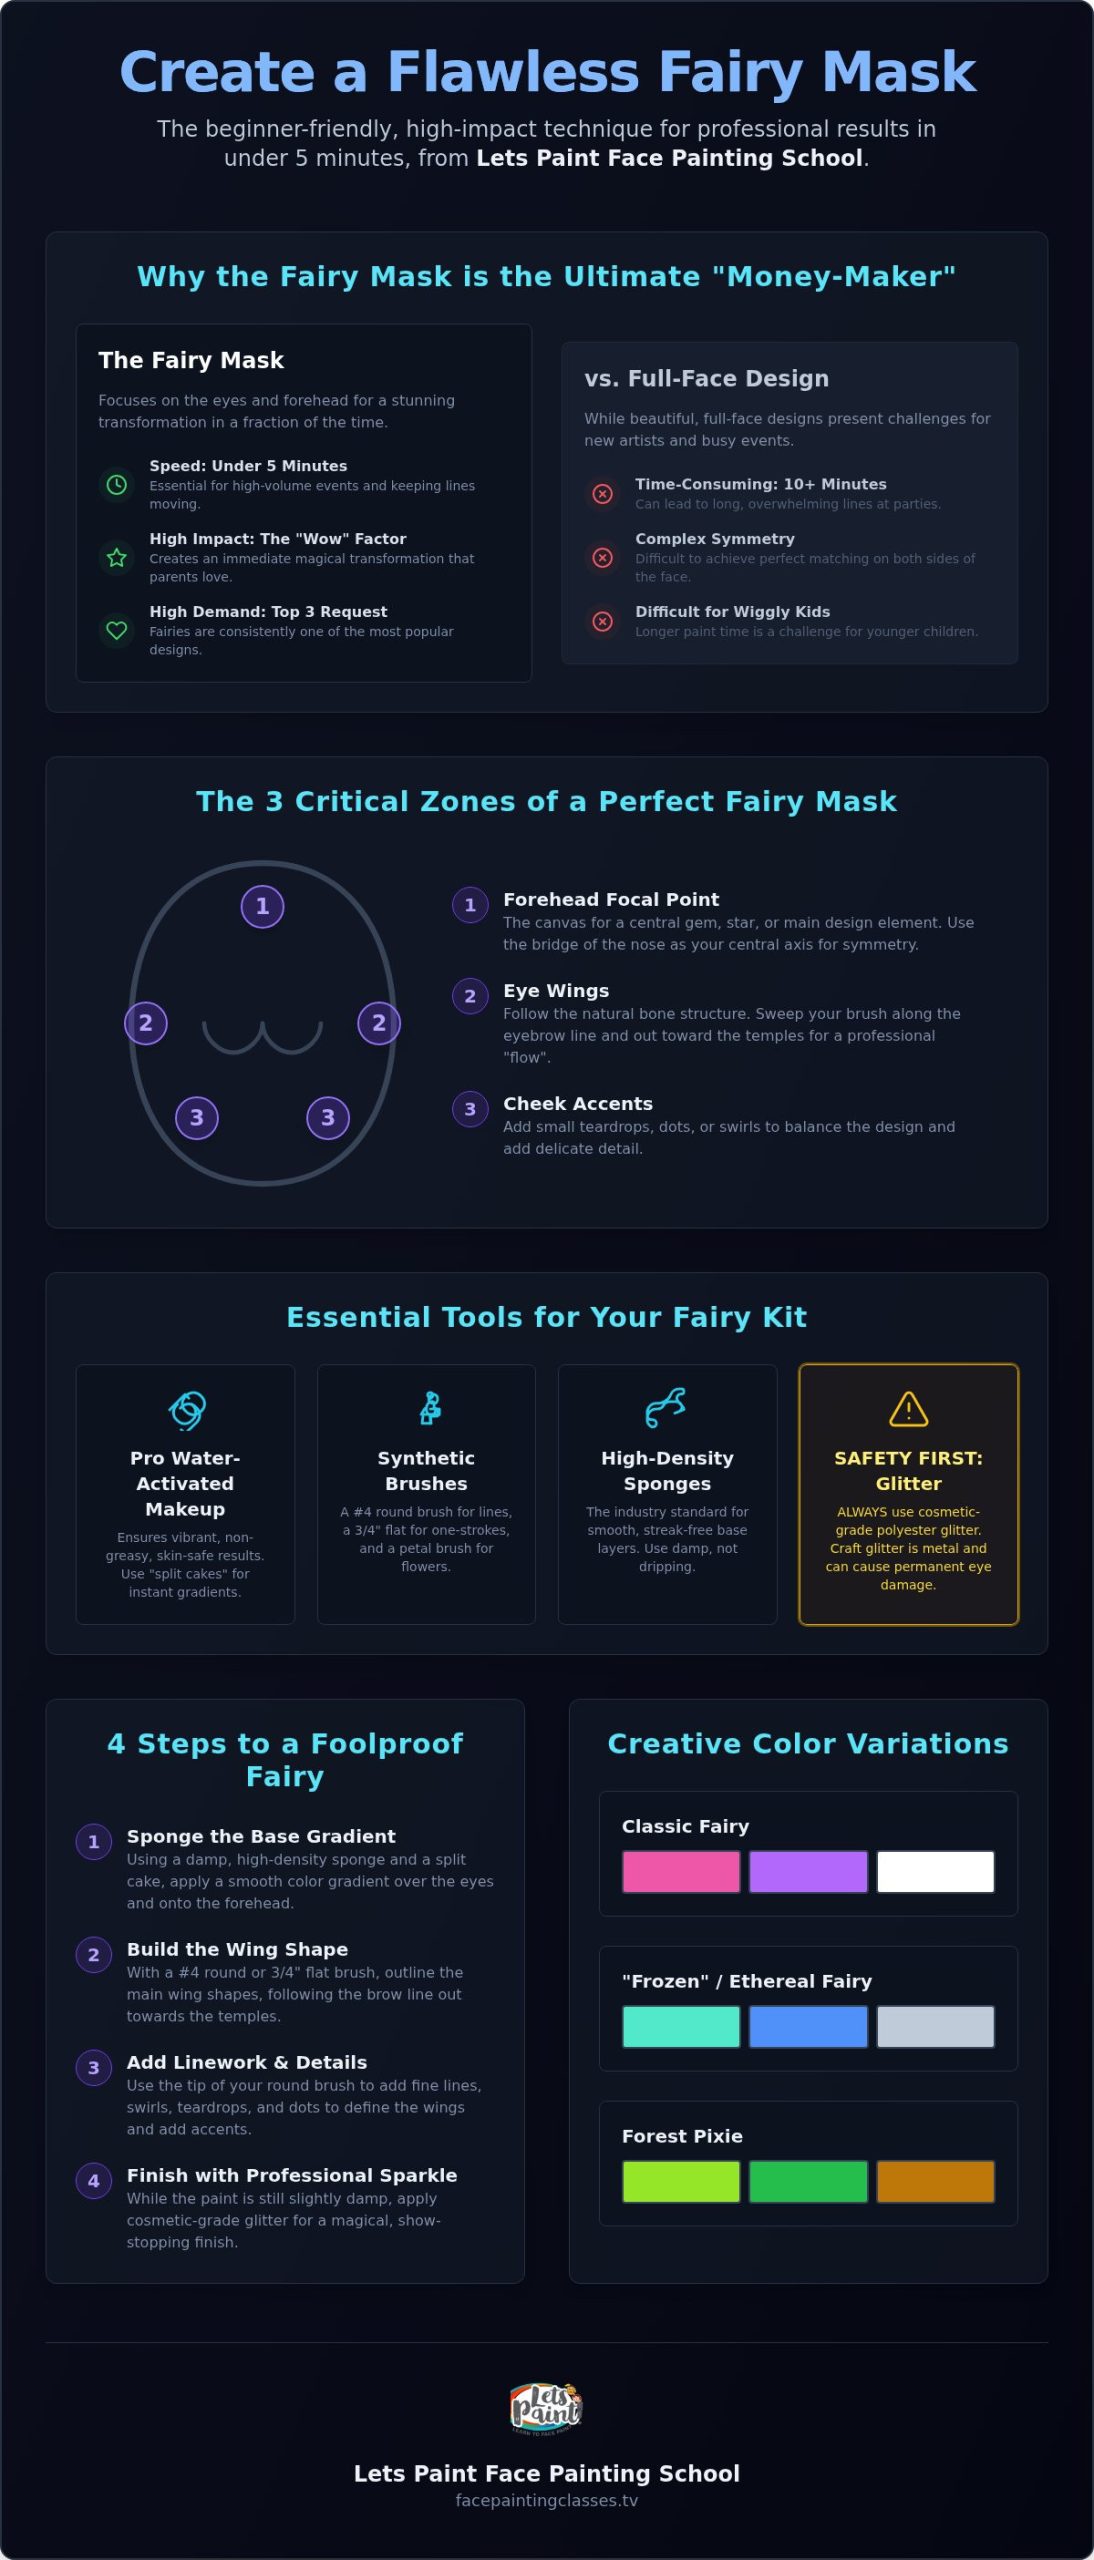
Professional face painting isn’t just about art; it’s about efficiency and connection. If you want to build a successful career or even just shine at a local fundraiser, you need designs that are fast, beautiful, and high-impact. The “Fairy Mask” is the undisputed champion for new artists. While a full-face design can take ten minutes or more, a mask focuses on the eyes and forehead, creating a stunning transformation in a fraction of the time. This speed is essential for high-volume events like festivals where a long line can become overwhelming. At Lets Paint Face Painting School, we prioritize these “money-maker” designs because they keep your chair moving and your clients happy.
Fairies consistently rank in the top three most requested designs at any party or event. This enduring popularity stems from the deep cultural history of face painting as a tool for storytelling and transformation. When a child looks in the mirror and sees shimmering wings, the psychological impact is immediate. They don’t just see paint; they see a magical version of themselves. For parents, seeing that “wow” moment is what makes your service worth every penny. By following an easy fairy face paint tutorial that emphasizes the mask over the full face, you ensure a professional result even if your subject is a wiggly toddler who can’t sit still for long.
The Anatomy of a Perfect Fairy Mask
To master this look, you must understand the three critical zones: the forehead focal point, the eye wings, and the cheek accents. Think of the forehead as your canvas for a central gem or star. Use the bridge of the nose as your central axis to guide your symmetry. Instead of fighting the natural curves of the face, follow the bone structure. Sweep your brush along the eyebrow line and out toward the temples. This creates a “flow” that looks organic and professional. If you use this easy fairy face paint tutorial to focus on these structural foundations, your designs will look balanced every time.
Choosing Your Magical Color Palette
Your choice of pigment can make or break the design. We highly recommend using “split cakes” or one-stroke palettes. These tools allow you to pick up a perfect gradient of colors on a single sponge or brush, giving you instant depth without extra effort. For a classic look, try a Pink, Purple, and White combo. If you want something more ethereal, Teal, Blue, and Silver work beautifully. Always use professional-grade, high-pigment paints to avoid “muddy” results where colors bleed together. Mastering these color choices is a core part of our Princess & Fairy Face Painting Designs module, where we help you transition from basic shapes to professional artistry.
Essential Tools for Your Fairy Face Painting Kit
Your journey through this easy fairy face paint tutorial begins with the right supplies. At Lets Paint Face Painting School, we’ve seen how the quality of your tools directly impacts your confidence and the final result. Professional-grade, water-activated makeup is non-negotiable. Unlike grease-based paints found in costume shops, professional cakes are designed for skin safety and vibrant pigment. They dry to a touch-proof finish, which is vital when you’re painting children who love to touch their faces. Always check the FDA safety guidelines to ensure your products meet cosmetic standards for facial application.
One critical safety warning we give every student: never use craft glitter. It’s often made of tiny metal shards that can cause permanent eye damage. Instead, always reach for cosmetic-grade polyester glitter. It’s cut into rounded shapes that are safe for the skin and provides that ethereal, professional sparkle that makes a fairy design truly come to life. Using the right materials isn’t just about the “wow” factor; it’s about being a responsible artist that parents can trust.
The Beginner’s Brush Selection
You don’t need dozens of brushes to start. A synthetic #4 round brush is your best friend for this easy fairy face paint tutorial. It’s perfect for creating the teardrops, swirls, and fine outlines that define fairy wings. For more advanced looks, a 3/4 inch flat brush allows you to load multiple colors at once for “one-stroke” wings. If you want a creative shortcut, the petal brush is a “cheat code” for adding instant flowers around your design with a single press. These synthetic bristles are superior to natural hair because they maintain their “snap” and shape when wet.
Sponge Mastery for Smooth Transitions
High-density sponges are the industry standard for creating smooth, streak-free bases. The secret to a perfect application is the “damp, not dripping” rule. If your sponge is too wet, the paint will run; if it’s too dry, it will look patchy. Use a dabbing motion rather than a wiping motion to maintain color vibrancy and prevent the base from looking muddy. Proper kit maintenance is just as important as the painting itself. You can find more details on keeping your tools sanitized in our guide on face painting for beginners. If you’re ready to master the art of the perfect base, our Sponge & Blending Techniques module offers the structured training you need to excel.
Step-by-Step Easy Fairy Face Paint Tutorial
Ready to transform your first model? Before you load your sponge, take a moment to prepare your canvas. Use a gentle, fragrance-free wipe to clean the skin, removing any oils or dirt that might interfere with the paint. Positioning is equally vital for stability. Ask the child to sit tall like a statue, perhaps resting their head back against a chair or your arm. This physical stability is the secret to clean lines. At Lets Paint Face Painting School, we teach our students that a steady base is the foundation of every professional design.
Step 1 involves sponging your base wings. Pick two colors from your palette, perhaps a soft pink and a vibrant purple. Using the damp sponge technique we discussed in the previous section, dab the lighter color near the inner corner of the eye and the darker shade toward the temple. Blend them where they meet to create a soft sunset effect. In Step 2, you will establish your central focal point. Paint a small star, heart, or even place a stick-on gem right between the eyebrows. This anchors the entire design and helps you maintain balance as you move to the outer edges.
Step 3 is where the magic happens as you add your “Magic Lines.” These teardrops and swirls define the outer edges of the wings and give the design its shape. Finally, Step 4 brings the finishing touches. A quick swipe of shimmering lipstick and a dusting of cosmetic glitter will make the child feel truly enchanted. This easy fairy face paint tutorial ensures you hit every checkpoint for a “wow” result without feeling overwhelmed by complex details.
Mastering the Teardrop Stroke
The teardrop is the most important stroke in your repertoire. We use a specific “Press, Drag, Lift” method to achieve this look. Start by pressing the tip of your #4 round brush down firmly to create a thick “head” for the drop. Drag it slightly while maintaining pressure, then slowly lift the brush as you pull toward your focal point. Every line you paint should point toward that imaginary spot between the eyebrows. This creates a sense of movement and professional flow that distinguishes a beginner from a trained artist. Practicing your line weight from thin to thick and back to thin is a core skill we emphasize in our Line Work Mastery module.
Adding Sparkle and Contrast
Highlights are the final secret to making your design pop off the skin. Use a high-pigment white to add tiny dots and “starbursts” over the darker areas of your sponged base. When it comes to glitter, you have choices. Glitter gel is excellent for precision, while puffing loose cosmetic glitter over damp paint creates a broader, ethereal glow. For a quick “fairy dust” effect, try using a star-patterned stencil on the cheeks. These small details are what we focus on in our more advanced Princess & Fairy Face Painting Designs lessons to help you achieve a high-end finish that parents will love.
Customizing Your Fairy: Variations for Every Occasion
Once you’ve grasped the core steps of this easy fairy face paint tutorial, the real magic begins with customization. At Lets Paint Face Painting School, we encourage you to see the base mask as a foundation that can be adapted for any theme or request. For instance, the “Frozen” Fairy is a perennial favorite. Simply swap your pinks for icy blues and silvers, then use a snowflake stencil to add a wintery touch. If you’re at an outdoor garden party, the Forest Pixie variation works beautifully. Reach for earthy greens and browns, and use your round brush to add delicate leaf patterns along the edges of the wings. You can even create a Floral Fairy by incorporating simple one-stroke flowers into the wing tips for an extra layer of elegance.
Adapting your art for different age groups is a vital professional skill. Toddlers often find full-face masks intimidating or uncomfortable near their eyes. In these cases, scale the design down into a small, elegant cheek or temple piece. Even when simplifying the look for a toddler, the principles of this easy fairy face paint tutorial remain the same. Keeping the paint away from the eyes ensures a happy child and a stress-free experience for the parents. This flexibility is what separates a casual hobbyist from a professional artist who can handle any situation with confidence.
Troubleshooting Common Fairy Flops
Every artist faces challenges, but the key is knowing how to recover with grace. If you find your lines are shaky, try the “pinky-rest” technique. Rest your pinky finger lightly on the child’s face to stabilize your hand while you draw. If you struggle with asymmetrical wings, don’t reach for the wipes just yet. Often, adding a small swirl or an extra cluster of dots to the smaller side can create a sense of balance without needing a total restart. If your paint is too runny and begins to drip, catch it immediately with a dry sponge or a cotton bud before it ruins your base colors. Managing moisture is a skill that takes practice, but it’s essential for a clean, professional finish.
Speed Tips for Busy Events
When the line at a festival stretches around the corner, efficiency is your best friend. The “3-Minute Fairy” focuses on the sponge gradient and glitter, skipping the intricate line work in favor of high-impact color. You can also use pre-made “bling clusters” or gems as your focal point to save precious seconds on the forehead design. These small investments can significantly increase your hourly rate at busy events. If you’re looking to expand your repertoire beyond fairies, check out our guide on animal face painting designs for more quick party staples. To truly elevate your speed and precision, we invite you to explore the Princess & Fairy Face Painting Designs module at Lets Paint Face Painting School.
Level Up Your Art with Lets Paint Face Painting School
Randomly searching for videos online often leads to a cycle of “YouTube-hopping.” You might find a clever trick here or there, but you miss the foundational skills that make an artist truly professional. While this easy fairy face paint tutorial gives you a fantastic start, a structured curriculum is what turns a casual interest into a sustainable career. At Lets Paint Face Painting School, we’ve designed our programs to fill those technical gaps. You won’t just learn how to copy a design; you’ll understand the mechanics of every brush stroke and how to troubleshoot on the fly.
The Ultimate Face Painting Course serves as our flagship program, offering a deep dive into every aspect of the craft. From mastering complex line work to understanding color theory, this course provides the roadmap you need to excel. You’ll also gain access to our supportive global community. This is a place where you can share your progress, receive professional critiques from experts like Maria Mitchell, and grow alongside other aspiring artists. If you’re ready to take the leap, learning how to start a face painting business is the logical next step in your transformation.
Inside the Princess & Fairy Module
Our specialized Princess & Fairy Face Painting Designs module takes the concepts from this easy fairy face paint tutorial and elevates them to a new level. You’ll move beyond simple masks to master intricate crowns and royal tiaras that look like wearable jewelry. We also focus heavily on the One Stroke Face Painting Techniques. This method allows you to create multi-dimensional, professional results with incredible speed. We also provide practical training on handling “wiggly” clients and various skin types, ensuring you’re prepared for any situation you might encounter at a busy event.
Turning Passion into Profit
Artistic skill is only half the battle when you want to turn your talent into a business. Professional-level designs allow you to move away from low-paying gigs and start charging the premium rates your talent deserves. Building a high-quality portfolio is essential for attracting high-end corporate clients and luxury birthday parties. At Lets Paint Face Painting School, we guide you through this process, helping you showcase your work in the best possible light. We believe in your potential to turn creativity into a profitable discipline.
Your transformation from a beginner to a pro is a journey we’re honored to support. Every master was once a student who decided to take their craft seriously and invest in their education. As we always say at Lets Paint Face Painting School: “Your creative journey starts with one brush stroke.”
Step Into Your Creative Future
You’ve now unlocked the core secrets of the “Fairy Mask” strategy and learned why professional tools are non-negotiable for safety and artistic results. This easy fairy face paint tutorial is just the beginning of your journey. By focusing on the natural flow of the face and mastering the foundational teardrop stroke, you’ve already built a solid framework for professional artistry. You have the power to create magical moments for children and parents alike while building a skill that is both rewarding and profitable.
If you’re ready to move beyond basic designs and start a successful career, it’s time to invest in your potential. Join The Ultimate Face Painting Course at Lets Paint Face Painting School today! Our platform provides access to over 100 professional design tutorials and step-by-step business training specifically for artists. You’ll also receive direct feedback from our founder, Maria Mitchell, to help you refine your technique and reach a high standard of excellence. Your transformation from a casual interest to a professional career is a journey we are honored to support. Believe in your talent and keep creating wonder.
Frequently Asked Questions
What is the easiest fairy face paint design for a total beginner?
The “Fairy Mask” is the simplest approach for anyone new to the craft. By focusing your art on the forehead and the outer corners of the eyes, you avoid the difficult mouth and chin areas. This method allows you to create a high-impact look quickly using this easy fairy face paint tutorial without needing complex full-face coverage.
How do I make my fairy wings look symmetrical?
Visual balance is more important than perfect mirror images. Use the bridge of the nose as your central axis and direct all your teardrops and swirls toward that single focal point. If one side looks slightly different, you can add a few extra dots or a small gem to create a sense of harmony without starting over.
What kind of glitter is safe to use for face painting?
You must only use cosmetic-grade polyester glitter. Craft glitter is often made of metal or glass shards that can cause permanent damage if they get into a child’s eyes. Professional cosmetic glitters are rounded and designed to be skin-safe, ensuring your magical designs remain beautiful and harmless.
How long does it take to learn professional fairy face painting?
You can master a basic, beautiful design in just a few minutes with our easy fairy face paint tutorial. To reach a professional level where you can charge premium rates, most students find that a few weeks of structured practice through our Princess & Fairy Face Painting Designs module provides the necessary confidence and speed.
Can I use regular acrylic paint for a fairy face tutorial?
No, you should never use acrylic or craft paints on the skin. These products are not designed for cosmetic use and can cause severe allergic reactions, rashes, or chemical burns. Always invest in professional water-activated makeup that is specifically formulated and tested for safety on human skin.
How do I stop my face paint from smudging on a child?
Control your water usage by following the “damp, not dripping” rule for your sponges and brushes. If the paint is too wet, it will run and smudge easily. Let the base layer dry for a few seconds before you begin your line work to ensure the colors stay crisp and vibrant throughout the event.
What brushes do I need for a simple fairy mask?
A #4 round synthetic brush is your most important tool for creating delicate teardrops and swirls. If you want to create multi-colored wings with a single stroke, a 3/4 inch flat brush is also helpful. These two brushes are sufficient for nearly any beginner fairy design you’ll encounter.
Do I need to be a professional artist to take a course at Lets Paint Face Painting School?
Not at all. We designed our curriculum to welcome everyone, from parents wanting to delight their children to individuals looking to launch a new career. At Lets Paint Face Painting School, we provide the structured guidance and community support needed to help you grow from a total beginner into a confident artist.
