
Blog, Learn Face Painting
Mastering Face Painting Symmetry: The Professional Guide to Flawless Designs in 2026
What if the secret to perfect symmetry isn’t about painting two identical sides, but about understanding how to trick the human eye? We’ve all been there; you’ve crafted a stunning butterfly wing on the left, only to feel a wave of anxiety as you approach the “difficult” side. Mastering face painting symmetry is often the biggest hurdle between a hobbyist and a professional who can confidently charge higher booking fees. It’s frustrating when lopsided designs make your portfolio photos look less than stellar, but you aren’t alone in this struggle.
At Lets Paint Face Painting School, we believe that balance is a technical skill rather than a natural gift. This guide reveals the professional secrets and muscle-memory drills used by world-class artists to achieve flawless balance on a three-dimensional canvas. We will walk you through anatomical anchors, focal point management, and the specific practice routines that will allow you to achieve professional-level results in seconds. Get ready to transform your artistic process and build the consistency your growing business deserves.
- Utilize the central axis and inner eye corners as anatomical anchors to ensure your designs are perfectly aligned before you apply the first stroke.
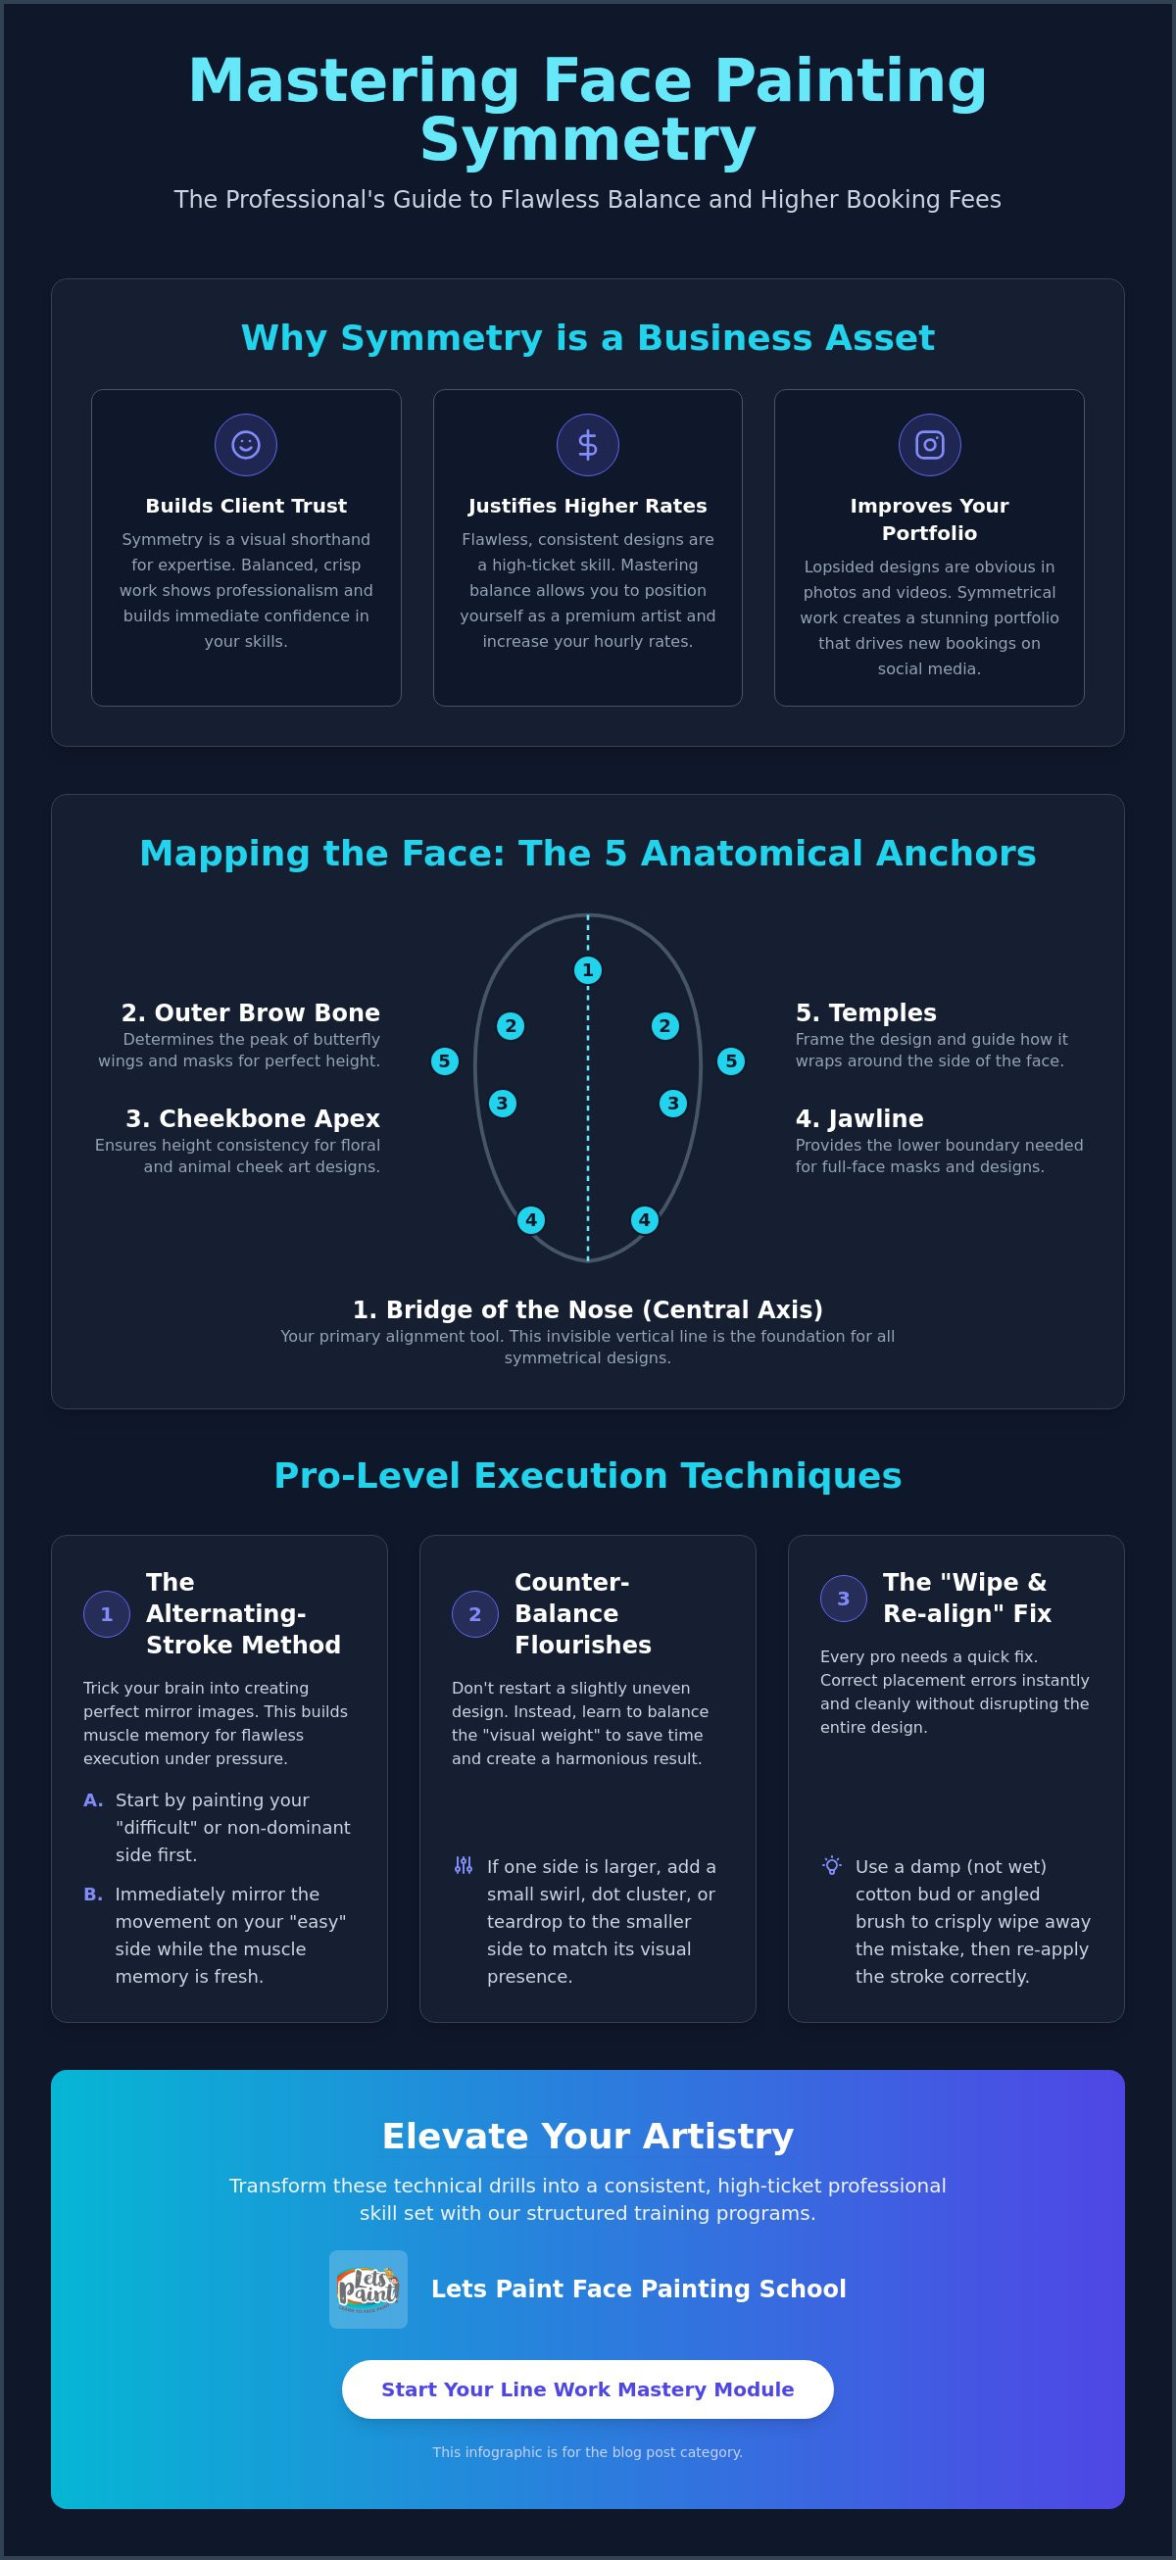
- Adopt the alternating-stroke method by painting your “difficult” side first, allowing your muscle memory to mirror the movement onto the easy side.
- Mastering face painting symmetry is achievable by using counter-balance flourishes to match visual weight without needing to restart your design.
- Learn to use the “wipe and re-align” technique with a damp cotton bud to professionally correct placement errors mid-service.
- Discover how the structured training at Lets Paint Face Painting School can transform these technical drills into a consistent, high-ticket professional skill set.
Why Symmetry is the Gold Standard of Professional Face Painting
Symmetry in our craft is the balanced distribution of colors, shapes, and line work across the face’s central axis. It’s more than just a technique; it’s a universal standard of excellence. When a parent or client looks at your work, their brain subconsciously scans for balance. If one side of a superhero mask is slightly higher than the other, you hit the “Uncanny Valley” effect. This makes the design feel “wrong” to the viewer, even if they can’t pinpoint the exact mistake. By mastering face painting symmetry, you correct these tiny visual errors before they can undermine your professional reputation.
Scientific studies on facial symmetry show that humans are biologically hardwired to associate balance with beauty and health. However, professional face painting isn’t about rigid mathematical perfection. Since no human face is perfectly identical on both sides, your goal is to create an artistic illusion of balance. You’re managing focal points and anatomical anchors to create harmony on a living, breathing surface. This distinction between math and art is what allows a design to look stunning even when the child is moving.
Symmetry as a Business Asset
Your technical precision acts as a visual shorthand for your expertise. In 2026, high-resolution social media content and short-form videos are the primary drivers for new bookings. If your butterfly wings are lopsided, it shows in every photo and video in your portfolio. Balanced, crisp work builds immediate trust with your clients, allowing you to position yourself as a high-ticket artist. When you demonstrate that you can execute flawless designs consistently, you gain the confidence to increase your hourly rates. This level of professional discipline is a core focus for every student at Lets Paint Face Painting School.
The 3D Canvas Challenge
The real test of your skill happens when the child moves. A design that looks perfectly centered while they are still might distort when they smile, laugh, or squint. You have to account for these muscle movements while you paint. You also need to avoid the “Profile View” trap. Many artists focus so much on the front-on view that they forget how the design wraps around the temples and jawline. Truly mastering face painting symmetry means learning to adapt your design to round, narrow, or heart-shaped faces without losing that central balance. It is a rhythmic process that requires you to stay eye-level with your subject to avoid the perspective distortion that happens when you look down at your canvas.
Mapping the Face: Anchor Points and Invisible Guidelines
To truly excel at mastering face painting symmetry, you must stop seeing the face as a flat photograph and start treating it as a complex topographical map. Every face is a unique landscape of curves, dips, and peaks. Professional artists don’t just “eyeball” it; they use anatomical landmarks to anchor their designs. By identifying these fixed points, you create a reliable framework that remains consistent even when your subject is moving or laughing.
Your primary alignment tool is the central axis. This invisible vertical line runs from the center of the forehead, down the bridge of the nose, to the middle of the chin. Aligning your design here is crucial because understanding natural facial asymmetry helps you realize that no two sides of a face are identical. Using the inner eye corner as a universal starting point for teardrops and swirls ensures your focal points are mirrored accurately relative to the eyes, which are the first thing people notice in any design.
For superhero masks or feline designs, use the ear-to-mouth line. This diagonal guide helps you create perfect, aggressive angles for cheekbone contours. If you’re tackling a complex piece, don’t be afraid to use “ghost guidelines.” These are very thin, pale brush strokes that map out the skeleton of your shape before you commit with bolder colors. If you want to dive deeper into these technical mappings, our Line Work Mastery module at Lets Paint Face Painting School offers step-by-step drills to sharpen your precision.
The Five Anatomical Anchors
We teach our students to focus on five key anchors to maintain balance. The bridge of the nose is your starting point for forehead-centered designs. The outer brow bone determines the peak of butterfly wings and masks. Use the cheekbone apex to ensure height consistency in floral and animal designs. Finally, the jawline and temples frame the face, providing the boundaries needed for maximum visual impact.
Visualizing Negative Space
Mastering face painting symmetry is as much about the paint you don’t apply as the paint you do. Train your eyes to see the “empty” areas between your brush strokes. Compare the distance from the eye to the design edge on both sides. You can also use the “Triangle Method.” Imagine a triangle connecting your top focal point to the two lowest points of your design. If the triangles on both sides are the same shape, your symmetry is on point.
The Alternating-Stroke Method for Flawless Execution
Rhythm is the heartbeat of a professional artist. Instead of completing one entire side of a face before moving to the next, the most effective way of mastering face painting symmetry is to work in pairs of strokes. This rhythmic approach keeps the physical sensation of the movement fresh in your nervous system. By mirroring each line immediately, you make it much easier to replicate the exact angle, length, and pressure on the opposite side before your brain loses the “feel” of the first stroke.
Follow this five-step sequence to maintain a perfect flow:
- Step 1: Paint the “difficult” side first. For right-handed artists, this is typically the left side of the child’s face. It’s easier to match your dominant side to a pre-existing shape than the other way around.
- Step 2: Mirror the stroke immediately on the “easy” side. Do this while the muscle memory is active and the brush load is similar.
- Step 3: Check your focal points after every pair. Pause for a split second to ensure you haven’t drifted away from the central axis.
- Step 4: Use your non-dominant hand for stabilization. Don’t let it hang idle; rest a finger lightly on the child’s crown or jaw to steady your own body and maintain a consistent distance.
- Step 5: Perform a final “Step Back” check. Physically move one step away from the chair to verify the overall balance before adding fine details or glitter.
Mastering Hand-Eye Coordination
Consistency is born from practice. We recommend the “Mirror Drill”: try drawing identical shapes on paper using both hands simultaneously to sync your brain’s hemispheres. Managing brush pressure is also vital, as inconsistent pressure is the leading cause of lopsided designs. You can refine these skills by developing muscle memory through repetitive advanced face painting techniques. At Lets Paint Face Painting School, we emphasize that technical drills are the bridge to creative freedom.
Proper Body Positioning
Your perspective dictates your accuracy. Standing directly in front of the client is essential for a symmetrical view; painting from the side often leads to “skewed” designs that only look straight from your specific angle. Follow the “Nose-to-Nose” rule by keeping your eyes level with the design’s central axis. Don’t be afraid to adjust the child’s chair or your own height. Looking down at a design naturally distorts your perception of height and width, so stay eye-level whenever possible.
Troubleshooting: How to Fix Asymmetry Mid-Design
Even the most seasoned artists encounter the occasional wobble. It’s a natural part of working on a living, breathing canvas. When you find yourself struggling with mastering face painting symmetry, the key isn’t to panic. Instead, use your technical toolkit to course-correct in real time. The “Wipe and Re-align” technique is your first line of defense. If a line is truly unsalvageable, use a damp cotton bud to precisely remove the error without disturbing the surrounding work. It’s always better to spend ten seconds resetting a line than ten minutes trying to hide a fundamental flaw.
If the error is subtle, try “Counter-Balance” strokes. If you’ve accidentally painted a butterfly wing slightly longer on the right, don’t try to shorten it. Instead, add a small, decorative flourish or an extra teardrop to the left side to match the visual weight. Strategic thickening is another professional secret; by slightly increasing the line weight of a stroke, you can bridge the gap between where a line is and where it should have been. To see these corrections in action, explore our Line Work Mastery tutorials.
The “Mirror Test” is perhaps the most powerful tool in your arsenal. Our brains often “auto-correct” what we see while we are in the middle of the creative process. By having the child look into a mirror, or by viewing the design through your own kit mirror, you break that mental illusion. The flipped perspective makes lopsidedness jump out immediately, allowing you to fix it before the paint dries.
The Art of Strategic Distraction
Sometimes, perfection isn’t the goal; harmony is. In face painting for beginners, we often teach students to use chunky glitter to mask uneven edges. This isn’t about being lazy; it’s about managing visual interest. Adding “Starbusts” or clusters of dots can draw the eye away from a slightly lower wing. You can also embrace “Organic Asymmetry” in floral or abstract designs, where nature’s own imperfections make the piece feel more authentic and less manufactured.
Training Your Eye to Spot Errors
Developing a “pro eye” takes intentionality. Try the “Upside Down” check by looking at your design from behind the child’s head; this new angle prevents your brain from filling in the gaps. Taking a quick photo on your phone can also help, as a 2D image makes 3D errors stand out with startling clarity. Finally, remember the 3-second rule used at Lets Paint Face Painting School: if you can’t see the error from three feet away in three seconds, the client won’t notice it either. Don’t let tiny imperfections slow down your line.
Elevate Your Artistry with Lets Paint Face Painting School
Building a successful career in this industry requires more than just raw talent; it requires a structured educational framework that turns creative passion into professional excellence. At Lets Paint Face Painting School, we’ve designed our curriculum to ensure these technical secrets become second nature to you. Symmetry isn’t just a single lesson in our program; it’s a core pillar of The Ultimate Face Painting Course. By focusing on the intersection of technical expertise and artistic wonder, we help you bridge the gap between a casual hobby and a high-level career where you can confidently charge the premium booking fees you deserve.
Our students gain access to exclusive video modules that dive deep into line work mastery and anatomical mapping. These aren’t just standard tutorials; they’re transformative journeys designed to rewire how you see and interact with the human face. You’ll receive professional, constructive feedback on your progress from Maria Mitchell and our supportive global community of artists. This personalized guidance is invaluable for your growth. It helps you identify the subtle habits or brush angles that might be holding you back from perfection. Having a mentor verify your progress ensures that your journey toward mastering face painting symmetry is both efficient and deeply rewarding.
Beyond Symmetry: The Path to Mastery
Once you’ve grasped the foundational principles of balance, the next step is integrating those skills with advanced methods like one-stroke techniques. True mastery comes when you can paint with incredible speed without sacrificing a single millimeter of precision. In our themed modules, such as our comprehensive guide to superhero face painting designs, you’ll learn how to apply symmetrical principles to high-impact, high-speed masks. We teach you how to maintain perfect focal points even when the pressure of a long line of excited children is on.
Join the Lets Paint Face Painting School Community
Becoming a professional artist is an ongoing process of discovery and growth. Joining the Lets Paint Face Painting School community gives you the benefit of a recurring membership, providing continuous skill development and fresh seasonal design updates to keep your portfolio ahead of the trends. Beyond the brushwork, The Face Painting Business Course provides the essential framework you need to market your technical skills, manage bookings, and build a sustainable, booked-out schedule. Whether you’re ready to commit to a full course or want to explore our individual workshops, your path to professional excellence is clear. Start your journey today and discover how a serious discipline can lead to incredible creative freedom.
Transform Your Artistry with Flawless Balance
You now have the technical blueprint for creating designs that feel harmonious and professional. By utilizing anatomical anchors and the alternating-stroke method, you can move past the frustration of lopsided wings and embrace a more rhythmic, confident workflow. Mastering face painting symmetry is the key to elevating your work from a casual hobby to a high-ticket career that commands respect and premium rates. Every stroke you mirror brings you closer to the consistent excellence that parents and event planners notice immediately.
At Lets Paint Face Painting School, we’re dedicated to guiding you through this artistic evolution. Founded by world-class artist Maria Mitchell, our platform offers a comprehensive video library covering everything from delicate animal textures to bold superhero masks. You’ll also find a supportive community forum where you can receive expert feedback on your journey. It’s time to stop worrying about the “difficult” side of the face and start celebrating your growth. Enroll in The Ultimate Face Painting Course at Lets Paint Face Painting School today! We believe in your potential and can’t wait to see your work shine with perfect balance.
Frequently Asked Questions
Is it possible to achieve 100% perfect symmetry in face painting?
Achieving 100% mathematical symmetry is impossible because human faces are naturally asymmetrical. Your goal is to create a beautiful illusion of balance that tricks the eye into seeing perfection. Focus on aligning key focal points like the inner eye corners and the bridge of the nose. This artistic harmony is what defines professional work, rather than rigid, identical measurement on every feature.
Which side of the face should I paint first to ensure balance?
You should always paint your “difficult” side first, which is typically the left side for right-handed artists. It’s much easier for your dominant hand to mirror a pre-existing shape than to try and match a perfect stroke on your awkward side later. This specific sequence is a fundamental part of mastering face painting symmetry and building consistent muscle memory for every design.
How can I train my non-dominant hand to be as steady as my dominant one?
Training your non-dominant hand involves using it primarily for stabilization rather than fine brushwork. Rest your non-dominant pinky or palm lightly on the child’s head to create a steady “bridge” for your body. Practice simultaneous drawing drills on paper to sync both sides of your brain. Over time, this physical connection reduces shakes and improves your overall control during complex designs.
What are the best tools to help with symmetry for a beginner?
The best tools for ensuring balance include a high-quality round brush for precise line work and a handheld kit mirror. A mirror allows you to see the design from a flipped perspective, which instantly reveals placement errors your brain might have ignored. You can also use very pale, watery paint to sketch “ghost guidelines” before committing with bold colors, helping you map out the design safely.
Does the shape of the child’s face affect how I should approach symmetry?
Face shape absolutely dictates your approach because anatomical landmarks shift between round, narrow, or heart-shaped faces. For example, a wider face requires you to pull your wing designs further toward the temples to maintain the correct proportions. At Lets Paint Face Painting School, we teach students to adapt their designs to the unique bone structure of every child to ensure the art looks balanced from every angle.
How do I fix a lopsided butterfly wing without starting over?
You can fix a lopsided wing by using the counter-balance method. If one wing is slightly shorter, add a small decorative flourish or an extra teardrop to that side to match the visual weight. If the placement is slightly off, you can also use strategic thickening of the outlines to bridge the gap. These small adjustments save time and keep your workflow moving during busy events.
How much does a lack of symmetry affect my professional face painting rates?
A lack of symmetry significantly impacts your ability to charge premium rates because lopsided work often looks unprofessional in high-resolution portfolio photos. Clients and corporate bookers associate technical balance with high-ticket expertise and reliability. By mastering face painting symmetry, you position yourself as a top-tier artist, which allows you to justify higher hourly fees and attract more lucrative business partnerships.
Can I use stencils to help with symmetry in complex designs?
Stencils are excellent tools for placing perfectly symmetrical focal points, such as central forehead elements or repeating textures. They provide a crisp, identical foundation that you can then frame with your own freehand line work. While they shouldn’t replace your hand-eye coordination drills, using them strategically helps maintain consistency across multiple children while speeding up your service time during high-pressure bookings.
