
Blog, Learn Face Painting
Fixing Muddy Face Paint Colors: The 2026 Professional Guide
Last Saturday, you were halfway through a high-stakes gig, applying a beautiful sunset blend, when your vibrant oranges and purples suddenly melted into a dull, murky brown. It’s a heart-sinking moment that every artist has faced, often leading to wasted professional-grade paint and a sudden dip in confidence while a client watches. At Lets Paint Face Painting School, we believe that fixing muddy face paint colors isn’t about having a “natural gift” for art; it’s a technical challenge involving water control and color theory. You don’t have to let a single bleed ruin your professional reputation or your creative joy.
We agree that achieving crisp, high-contrast designs is what separates a hobbyist from a professional. This guide will help you master the art of clean, vibrant designs by teaching you how to prevent and correct muddy paint with expert techniques. We’ll explore 2026 trends like Plum Noir and Jade, manage color temperature, and share the secrets of fixing mistakes on the fly to deliver professional-level results every time.
Key Takeaways
- Discover the “Inky to Creamy” spectrum to master water control and prevent colors from bleeding into each other on the skin.
- Learn the critical difference between analogous and complementary colors to avoid the accidental “gray zone” in your blends.
- Gain practical skills for fixing muddy face paint colors on the fly using professional lifting and precision erasing techniques.
- Stop over-working your paint by learning how to load your brush without activating the entire cake for crisper, cleaner line work.
- Understand how structured training at Lets Paint Face Painting School can transform your creative passion into a high-level professional career.
Understanding Why Your Face Paint Designs Look Muddy
In professional artistry, “muddy” refers to an unintended desaturation of your palette. It happens when pigments mix in a way that kills their vibrancy, leaving behind a dull tone. This often feels like a personal failure, but it’s usually just a misunderstanding of how pigments interact. At Lets Paint Face Painting School, we see students struggle with this “gray zone” early on, where colors lose their identity and merge into a flat, unappealing sludge. It isn’t just about the colors themselves; it’s about the physics of the application.
The psychological impact of a ruined design is real. When your colors bleed at a paid gig, your confidence can vanish instantly. You might start to second-guess your brush strokes or avoid complex blends altogether. Mastering the skill of fixing muddy face paint colors begins with recognizing that this isn’t a lack of talent. It’s a technical hurdle. Much of this comes down to understanding color theory and how light interacts with layered pigments. When you over-work the paint by dragging your brush through wet layers repeatedly, you’re physically forcing different hues to combine into a neutral mess rather than allowing them to sit in clean, vibrant layers.
The Three Primary Culprits of Color Bleeding
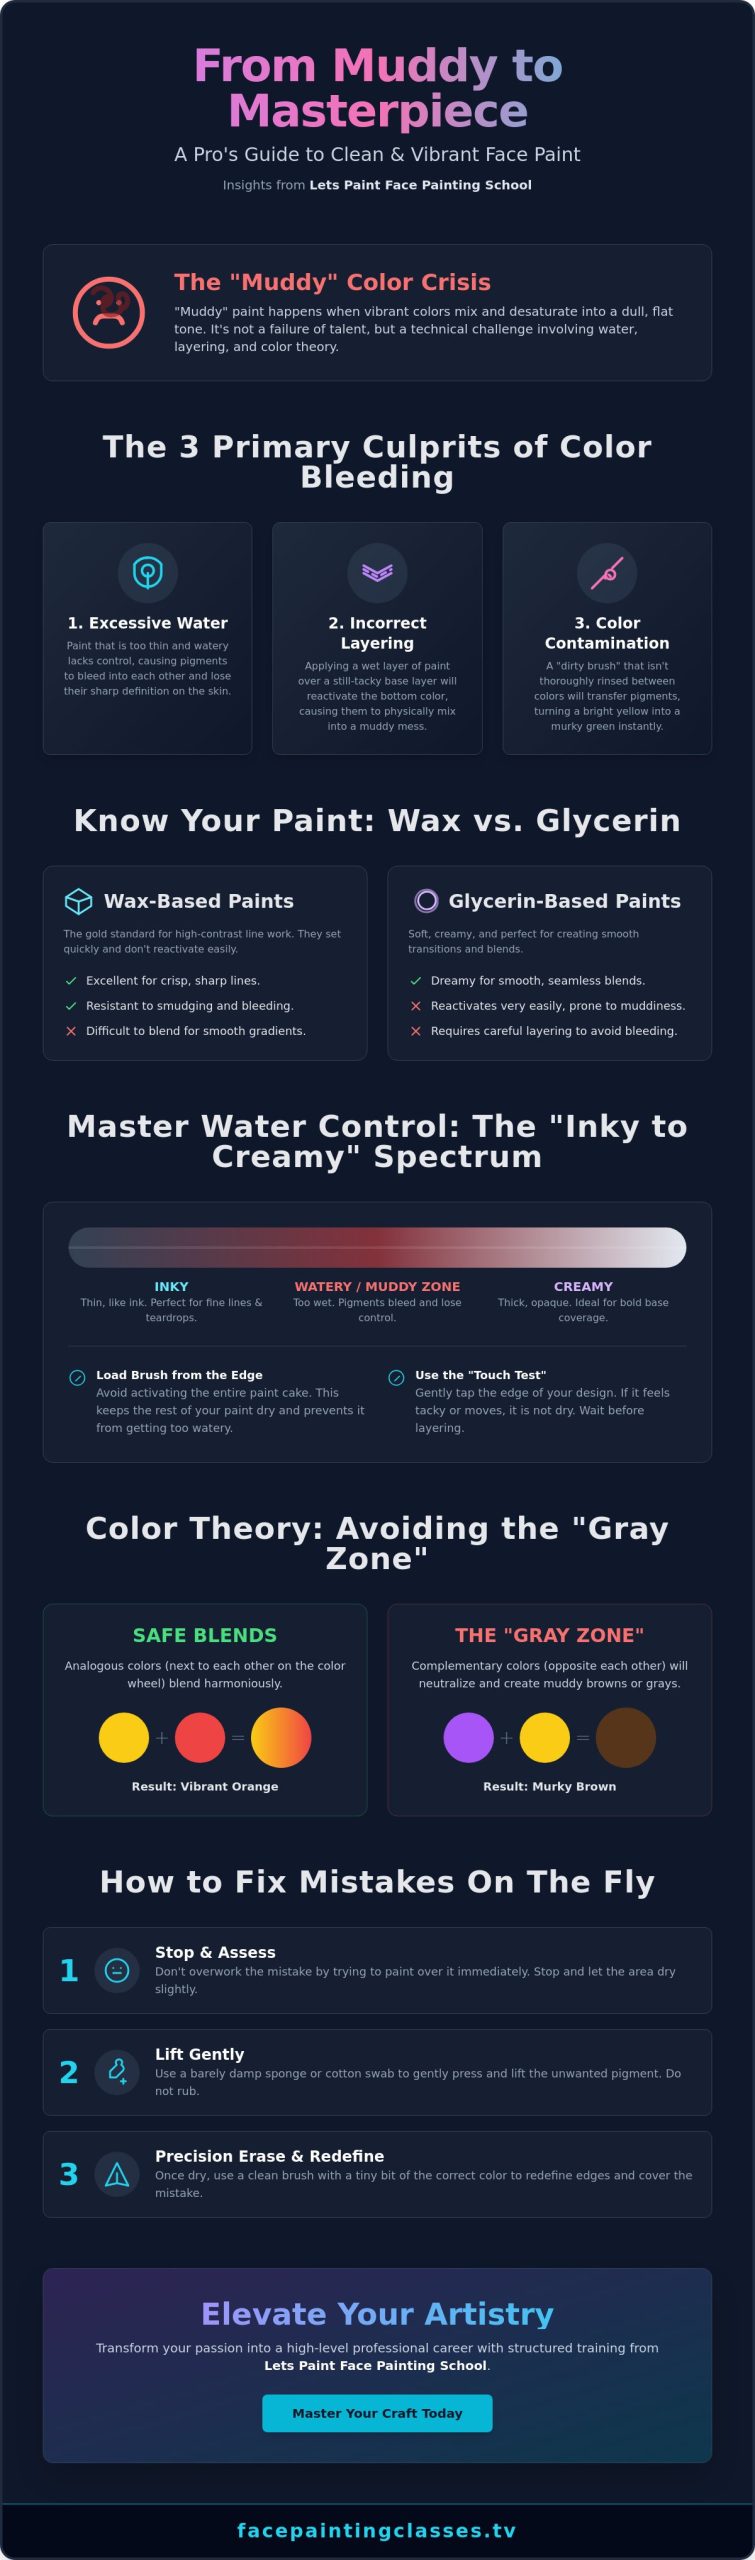
Most muddiness can be traced back to three simple mechanical errors. First, excessive water usage is a major trap. If your paint cake looks like a puddle, your consistency is too thin to hold its place. Second, incorrect layering often involves painting wet-on-wet without a clear strategy, which causes the bottom layer to reactivate and mix with the top. Finally, color contamination, or “dirty brush” syndrome, happens when you don’t thoroughly rinse your tools between contrasting colors. Even a tiny bit of blue left in your bristles will turn your bright yellow into a murky green instantly.
Wax-Based vs. Glycerin-Based Paints
The chemistry of your kit matters more than you think. Wax-based paints, often containing paraffin, are the gold standard for high-contrast line work because they stay exactly where you put them. They don’t blend easily, which is actually a benefit when you want crisp edges. On the other hand, glycerin-based paints are soft and creamy. They’re a dream for smooth transitions, but they’re incredibly prone to muddiness because they reactivate so easily. Choosing the right base for your specific design is a hallmark of a professional who has moved beyond casual interest into a serious discipline.
Mastering Water Control and Layering Techniques
Mastering water control is the single most important skill for any artist who wants to stop fixing muddy face paint colors after every design. Think of your paint as a living substance that changes based on how much moisture you introduce. We teach students at Lets Paint Face Painting School to visualize the “Inky to Creamy” spectrum. An “Inky” consistency is perfect for fine, swirling teardrops, while a “Creamy” texture provides the opaque coverage needed for bold blocks of color. If you’re constantly fighting muddy results, you’re likely stuck in the watery middle ground where pigments bleed uncontrollably.
Loading your brush is a delicate dance. Instead of swirling your bristles into the center of the cake and activating the entire surface, try loading from the edge. This keeps the rest of your paint dry and ready for the next design. Once applied, use the “Touch Test.” Gently tap the edge of your design with a clean finger. If it feels tacky or moves, it isn’t ready. Painting over a wet base is the fastest way to create a muddy gray zone, as the new layer will physically pull up the pigment beneath it.
For those looking to refine their transitions, using sponges can be a game-changer. Dabbing, rather than dragging, allows you to layer colors without disturbing the base. If you want to dive deeper into these specific motions, our Sponge & Blending Techniques course offers a step-by-step breakdown of professional movements that ensure your colors stay vibrant and distinct.
The Art of the “Dry Brush” Technique
Sometimes, the best way to add a highlight is to use a brush that is barely damp. This technique is essential for adding white highlights over dark colors like black or deep blue. By keeping the moisture low, you prevent the base color from lifting into your top layer. A professional secret we often share at Lets Paint Face Painting School is using a light mist of setting spray between layers. It creates a thin barrier that locks the first color in place, making it much easier to paint on top without any bleeding.
Hygiene and its Impact on Color Clarity
Your water is your most important tool, yet it’s often the most neglected. We recommend a “Two-Cup” system. One cup is strictly for rinsing the pigment out of your bristles, and the second cup stays clean for fresh activation. This ensures you aren’t introducing muddy residue back into your cakes. You should also rinse your sponges more often than you think. A sponge that looks clean can still hold enough old pigment to dull your next blend. For more tips on setting up your professional kit, check out our guide on Face Painting for Beginners. Combining these habits with a complete guide to color theory will elevate your work from amateur to exceptional.
Color Theory Secrets: Avoiding the “Gray Zone”
Water control is half the battle, but your palette choices finish the fight. Even with perfect moisture levels, you can still end up with a murky mess if you don’t respect the laws of physics. At Lets Paint Face Painting School, we teach artists to distinguish between analogous and complementary colors. Analogous colors sit next to each other on the wheel, like blue and teal. They are your best friends for smooth, vibrant blending. Complementary colors, however, are opposites. While they look stunning when placed side by side, they create a dull, desaturated “gray zone” the moment their wet edges touch. Understanding these relationships is the secret to fixing muddy face paint colors before they even touch the skin.
The biggest trap for beginners is trying to blend opposites like red and green or orange and blue. On a canvas, these might create a sophisticated shadow, but on a child’s face, they just look like dirt. If your design requires high-contrast hues to meet, you must use a “Bridge Color.” For example, if you want to transition from a fiery red to a deep green, use a bright yellow or orange in between. This intermediate step prevents the primary pigments from canceling each other out. It’s also vital to remember that pigments have different levels of transparency. Yellow is notoriously fragile. If you try to blend a dark purple into a bright yellow, the darker pigment will “eat” the lighter one every time, leaving you with a bruised look rather than a sunny glow.
The “Mud-Free” Blending Chart
To keep your work professional, stick to foolproof combinations that stay bright. Safe zones include Pink to Purple, Yellow to Orange, and Teal to Royal Blue. Your “No-Go” zones are Blue/Orange, Purple/Yellow, and Red/Green. If you absolutely must place these clashing pigments together, use a buffer of white or metallic silver. This creates a visual break that protects the integrity of each hue. It’s a simple trick that separates casual hobbyists from those pursuing a high-level career in the arts.
Value Contrast: The Secret to Professional Depth
Depth isn’t just about color; it’s about value. Value refers to how light or dark a color is. Professional painters know that painting light-on-dark is significantly harder because the dark base often bleeds through. To achieve that “pop” without muddiness, use high-value colors like neon lime or crisp white only once the base layer is completely dry. If you want to push your skills further, our guide on Mastering Advanced Face Painting Techniques dives deep into how value contrast can define a character’s features without a single muddy stroke.
Step-by-Step: How to Fix Muddy Mistakes on the Fly
When you are standing in front of a long line of eager children at a festival, you don’t have the luxury of starting over. A muddy blend can feel like a disaster, but professional artistry is often about how well you hide your “happy accidents.” Unlike casual advice found on social media that suggests wiping the entire face clean, we teach a more surgical approach. Mastering the art of fixing muddy face paint colors while your client is still in the chair is what separates a stressed amateur from a confident professional. It requires a calm hand and a few clever tricks to restore the vibrancy you originally intended.
The “Lifting” technique is your first line of defense. If a top layer has bled into your base, take a clean, slightly damp brush and gently “mop” up the offending pigment. Because you’ve already learned to let your base layer dry, the top layer should lift away without disturbing the work beneath. For even smaller errors, like a shaky line or a tiny bleed near the eye, a clean Q-tip is your best friend. Dampen it slightly and use a twisting motion to “erase” the mistake with precision. If the transition still looks a bit murky, consider the “Glitter Save.” Applying a pop of iridescent glitter over a slightly muddy blend can mask the desaturation and draw the eye toward the sparkle instead of the pigment.
The 60-Second Rescue Protocol
- Step 1: Stop painting immediately. If you keep moving the brush, you’ll only drive the muddy pigment deeper into the layers. Let the area dry completely.
- Step 2: Assess the damage. If the color is sitting on top, use the lifting technique. If it has already merged, you’ll need to cover it.
- Step 3: Apply a high-pigment white or black. These “power colors” can redefine the structure of your design and hide the gray zone beneath.
Redefining Line Work to Restore Contrast
Bold black outlines are the ultimate “eraser” in face painting. If your colors have become desaturated and lost their shape, a crisp, professional outline can instantly restore the design’s integrity. By creating a strong focal point with high-contrast lines, you guide the viewer’s eye away from the muddy areas and toward the intentional structure of the piece. This is where your technical proficiency truly shines. If a mistake is truly unsalvageable, use a baby wipe to remove only that specific section, then pat the skin dry before reapplying. It’s a graceful way to pivot without losing the child’s trust. To sharpen these recovery skills, we recommend exploring our Line Work Mastery course at Lets Paint Face Painting School, which focuses on the precision needed for these high-stakes moments.
Elevate Your Artistry with Lets Paint Face Painting School
Learning the mechanics of moisture and the science of the color wheel is just the beginning of your transformation. While this guide provides the foundational steps for fixing muddy face paint colors, true mastery comes from consistent, structured practice. You don’t have to spend years in a cycle of trial and error, wasting professional-grade paint on designs that don’t meet your standards. At Lets Paint Face Painting School, we’ve designed a pathway that turns creative curiosity into high-level proficiency. We believe that every artist has the potential to create vibrant, high-contrast work that leaves a lasting impression on every client.
Our flagship program, The Ultimate Face Painting Course, features dedicated modules that dive deep into the nuances of color theory. You’ll move beyond basic mixing and learn how to anticipate how pigments will behave on different skin types. This structured approach ensures you aren’t just reacting to mistakes, but preventing them entirely. By understanding the chemical and visual properties of your kit, you gain the confidence to tackle complex designs at paid gigs without the fear of your colors bleeding into a dull gray mess. It’s about moving from a casual interest to a disciplined, professional practice.
The journey is even more rewarding when you aren’t traveling alone. When you join our community, you gain access to a private network of artists who share your passion for excellence. This environment provides the professional feedback necessary to sharpen your skills quickly. You can share your progress, ask specific questions about difficult blends, and celebrate your growth with peers who understand the rhythmic nature of our craft. This collective wisdom is a hallmark of the Lets Paint Face Painting School experience, positioning you for long-term success in the industry.
Why Mentorship Matters in Face Painting
There is a specific “brush feel” that is difficult to capture through text alone. Through our detailed video demonstrations, you can observe the exact pressure and angle needed to keep your colors crisp. Under Maria Mitchell’s expert guidance, you’ll learn to avoid the common beginner pitfalls that lead to desaturation. This mentorship bridges the gap between raw talent and professional success, offering you a global perspective on modern face painting trends. You’ll learn the fine details of instruction that make your work stand out in a crowded market.
Take the Next Step in Your Creative Journey
If you’re ready to move beyond the occasional hobby and build a sustainable career, we invite you to join our specialized workshops. These sessions are designed to refine your technical execution and prepare you for the demands of the professional world. For those ready to launch their own brand, our guide on How to Start a Face Painting Business offers the strategic roadmap you need. Your canvas is waiting, and we are here to help you shine. Let’s turn your artistic wonder into a high-level career together.
Ready to Paint with Professional Brilliance?
You now have the technical foundation to transform your artistry from a casual interest into a professional discipline. By mastering the “Inky to Creamy” water spectrum and respecting the delicate balance of the color wheel, you have the power to keep your designs crisp and vibrant. Remember that fixing muddy face paint colors is a skill that improves with every stroke, whether you’re using the surgical lifting technique or redefining your work with bold, high-contrast line work.
If you’re ready to commit to your success, we invite you to join our growing family of artists. Join The Ultimate Face Painting Course at Lets Paint Face Painting School today! Founded by professional artist Maria Mitchell, our school provides comprehensive video tutorials for all skill levels. You’ll also gain access to a supportive private community forum where you can receive the mentorship needed to truly excel. Your creative potential is limitless, and your next masterpiece is just a brushstroke away. We’re here to help you shine on this transformative journey.
Frequently Asked Questions
Why does my face paint look gray when I mix blue and orange?
Blue and orange are complementary colors, which means they sit directly opposite each other on the color wheel. When you mix opposites, they cancel each other out and create a neutral, desaturated gray or muddy brown. To keep your designs vibrant, place these colors side by side but avoid blending their wet edges. Understanding this relationship is a core pillar of the curriculum at Lets Paint Face Painting School.
Can I fix a muddy face paint design without washing the whole thing off?
Yes, you can use a damp Q-tip or a clean, “thirsty” brush to lift the muddy pigment while it is still slightly damp. Once the area is dry, you can redefine the design with high-pigment black or white line work. This surgical approach is the most effective method for fixing muddy face paint colors during a busy event without losing your place in line.
How much water should I actually use for face painting?
You should use just enough water to reach a creamy, melted chocolate consistency for most applications. If your paint cake has standing puddles, you’ve used too much, which leads to uncontrollable bleeding. Try using a fine mist spray bottle to dampen your cakes instead of dipping your brush directly into a water cup. This gives you much better control over the pigment density.
Does the quality of the brush affect how muddy the colors look?
High-quality synthetic brushes are essential because they hold their shape and release paint evenly. Cheap brushes with frayed or soft bristles often hold too much water in the ferrule, which can suddenly leak into your design. When your tools are unpredictable, it’s much harder to maintain the crisp edges needed for professional-level work. Investing in professional brushes prevents many common blending frustrations.
Why does my white face paint always turn pink when I paint it over red?
This happens because the red pigment reactivates and bleeds into the wet white paint. To prevent this “ghosting” effect, wait until the red layer is completely matte and dry to the touch. Use a very thick, waxy white consistency with minimal water. By “stamping” the white on rather than dragging the brush, you can sit the new color on top without disturbing the base.
What is the best way to clean my brushes during a busy event to keep colors bright?
The two-cup system is the industry standard for maintaining color clarity. Use your first cup of water to vigorously rinse out the bulk of the pigment and a second cup of clean water for your final rinse. This ensures that you aren’t accidentally introducing old, dark pigments into your bright yellows or whites. Swiping your brush over a textured cleaning pad can also help remove stubborn residue.
Are certain brands of face paint more prone to becoming muddy?
Glycerin-based paints are generally more prone to muddiness because they stay soft on the skin and reactivate very easily. While they are wonderful for smooth blending, they require a delicate touch during layering. Wax-based paints dry more quickly and provide a firmer surface for fixing muddy face paint colors or adding detail. At Lets Paint Face Painting School, we recommend practicing with both to understand their unique properties.
How long should I wait between layers to prevent color bleeding?
Most professional face paints dry within 10 to 30 seconds, but high humidity can slow this process down. You can tell a layer is dry when it loses its shiny, wet appearance and looks matte. If you’re in a hurry, you can use a small handheld fan to speed up the drying time. Always perform a quick “touch test” on a non-visible edge before applying your next layer.
